Getting Started with Docker Part 1: Running Containers
This blog post was originally published 22 April 2017. I have recently updated content to reflect changes to syntax and context as well as compatibility with a Docker alternative: Podman.
Containers and container architecture are now standards in software development and infrastructure today. Docker seems to be the canonical implementation of container technology, though it is not the only one. Podman is a robust Docker alternative that helps manage containers. This post is part 1 in a series that serves as a brief introduction to containers and a primer on getting up and running with Docker. We will cover the following topics in this post:
Feel free to open your command prompt and favorite text editor before we get going. The last section walks you through some hands-on activities. These exercises assume some familiarity in working with command line tools and some basic knowledge of Linux system administration. You can get by without much of either.
Overview of Containers and Docker
First, what problems are containers attempting to solve? One of the primary objectives of containers is to normalize the environment that applications run in. The feared "it works on my machine" bug is a product of some of the challenges of having environmental differences between development, testing, and production. Containers provide one avenue to smooth out those differences.
If you have ever worked with a tool like Vagrant, you have seen a similar solution in action. The difference is that Vagrant is oriented around standing up a complete virtual machine (VM) whereas container solutions stand up much smaller virtualized systems in a host environment. You can see in these diagrams from Docker that VMs have a few more layers than containers, including the hypervisor and guest operating system. Most issues with performance in VMs stem from the heft of these two layers. You can see from the following diagrams that replacing the hypervisor and guest OS with Docker Engine results in a leaner tech stack.
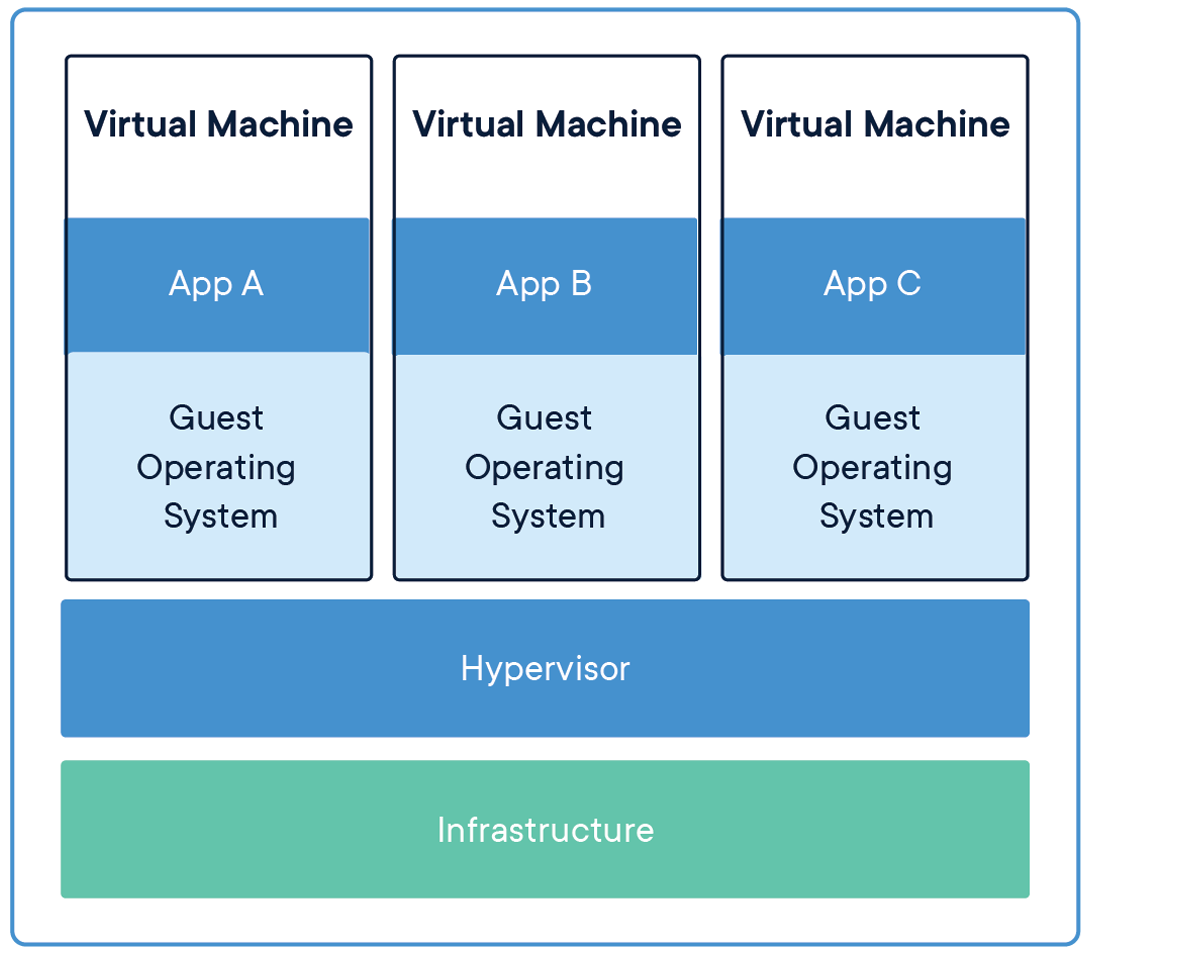
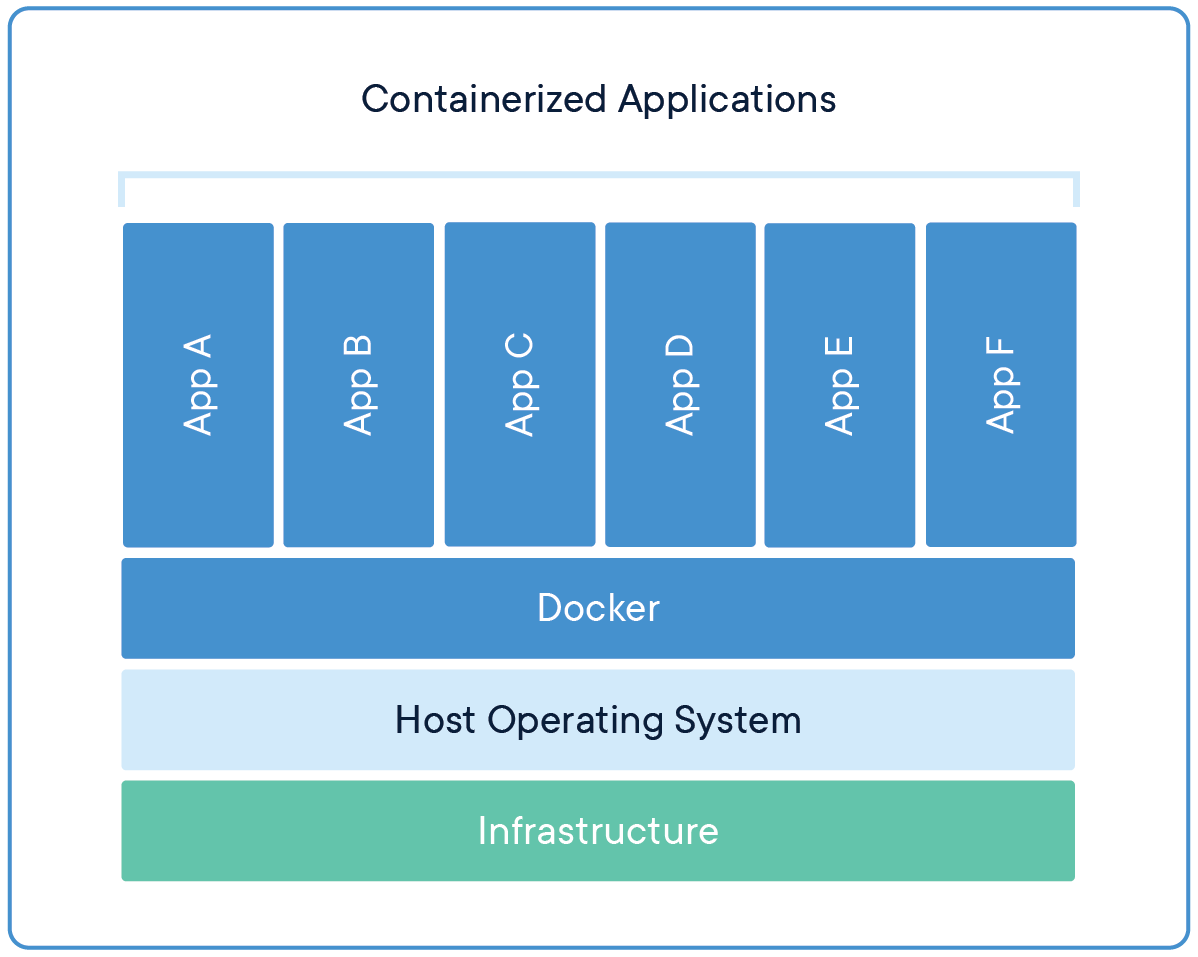
The biggest benefit to the difference in virtualization strategy between VMs and containers is that containers are lighter, faster, and leaner than VMs. Containers share the host kernel rather than running separate kernels on top of the hypervisor.
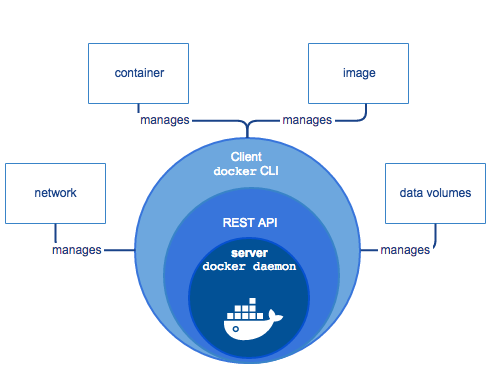
When you install Docker on your machine, you install the Docker Engine virtualization layer along with the Docker command-line client. This CLI is what you typically work with when developing with Docker. The client communicates with the host Docker program via an HTTP API, so the included Docker CLI is just one possible client of Docker Engine.
A Note on Docker Alternatives
When this post was originally authored, Docker was the way to set up and manage a container environment. The origins of containers stretch back before Docker, but the tools and techniques to manage them were more complex. One of the achievements of Docker was normalizing that experience across platforms and making it much more accessible.
While I appreciate the folks at Docker and the project for making containers more approachable, I've not personally been thrilled with how the company has evolved and altered some of their licensing. It's still the go-to tool for container developers, but I have been leaning towards tools like Podman as an alternative CLI and runtime for managing containers. A lot of the techniques, components, and file formats are open-source, so you can plug and play (mostly) with other tools.
All of the docker commands you see here can also be run with podman if you would prefer to give it a try yourself.
Installing Docker
The installation process for Docker varies depending on your target platform, but to install it on your local development machine you can typically use Docker Desktop for Windows and Mac machines. On Linux, seek instructions to install relevant packages for your distribution.
Note: Both installation methods above have specific operating system requirements, so check the Docker documentation before proceeding.
Note: Docker Desktop is free for personal use and is the easiest way to stand up a container environment on modern systems. Docker does require paid licensing for professional use of the Desktop product.
The installation instructions on the Docker website typically also include a step to run a hello-world container.
Go ahead and try this to verify that everything works.
When you can successfully run the hello-world container, proceed with the rest of the guide below where we get to work with different components of Docker.
Running a Container
At this point, you should have been able to run at least one Docker container after installing Docker on your machine.
The hello-world container is very simple, but it demonstrates one function Docker can perform: running a one-off program.
Here is what happens when you execute docker run hello-world from the command line:
- The Docker CLI tells Docker Engine on the host that you want to spin up a container from an image called "hello-world".
- Docker Engine on the host looks for an image by that name in its local cache, and failing to find one, it reaches out to known Docker registries to look for it. The default registry is Docker Hub.
- Finding the image on Docker Hub, Docker Engine downloads a copy, and executes it in the host environment.
- Output from the container is streamed to the local command line.
- The main process inside the container terminates, signaling Docker Engine to stop the container.

Long-Running Containers
The hello-world container stops immediately because it does not host a long-running process.
Many containers kick off a process that is meant to stay running. For example, databases and web servers are common long-running processes because they need to keep listening for new connections or requests.
In the following examples, we will work with nginx, a lightweight web server.
The nginx Docker image starts the program in such a way that it does not terminate immediately.
In this case, Docker Engine leaves the container up and streams logs to our console.
We can try this by running docker run --rm -p 8080:80 nginx from the command line.
This time when we ran a container, we provided two additional options to the docker run command: --rm and -p 8080:80.
The --rm option tells Docker Engine to remove the container when it stops.
This is not a required option flag, of course, but it is a good habit to get into in order to keep our Docker environment clean.
Containers are meant to be thrown away.
The -p 8080:80 option tells Docker Engine to map port 8080 on the engine to port 80 on the container.
This allows us to view the nginx page in the browser.
By default, Docker Engine does not do any port mapping regardless of what ports containers declare that they expose.
We should see the following output from the command:
Unable to find image 'nginx:latest' locally latest: Pulling from library/nginx Digest: sha256:f2d384a6ca8ada733df555be3edc427f2e5f285ebf468aae940843de8cf74645 Status: Downloaded newer image for nginx:latest
The container should have started, so let's open our browser and navigate to http://localhost:8080. We should see the nginx welcome page. If we check back in our console, we should see a log entry for the HTTP request we just made:
192.168.99.1 - - [07/Feb/2017:16:01:08 +0000] "GET / HTTP/1.1" 304 0 "-" "Mozilla/5.0 (Windows NT 10.0; WOW64) AppleWebKit/537.36 (KHTML, like Gecko) Chrome/56.0.2924.76 Safari/537.36 OPR/43.0.2442.686 (Edition beta)" "-"
Now we type Ctrl+C or Cmd+C to stop following the logs of the container.
Note that the container is still running.
We can execute docker ps to view a list of active containers:
CONTAINER ID IMAGE COMMAND CREATED STATUS PORTS NAMES 80a02fcbb904 nginx "nginx -g 'daemon ..." 6 minutes ago Up 6 minutes 443/tcp, 0.0.0.0:8080->80/tcp vigilant_lamarr
Here we can see several key properties of the container including the image it is from, exposed and mapped ports, as well as a name that Docker assigned to the image.
We can customize the name by adding an option flag like --name my_nginx_container to our docker run command.
Now let's stop our container by running docker stop vigilant_lamarr.
Make sure to use the container name that we retrieved from the console output of docker ps.
If we run docker ps again, you should see an empty table.
Images like nginx that execute a long-running process are meant to be run with the -d option flag.
This starts the container just like before, except Docker returns us to the command prompt immediately without streaming the logs.
We can still access the logs from a container by running docker logs vigilant_lamarr (again, remember to use your container name).
Interactive Containers
Some images are meant to be run as interactive containers with the flags -i and -t. For instance, what if we want to work on a base Ubuntu image from the command line to try out a couple of utilities?
We could launch an Ubuntu container straight into bash with the command docker run --rm --name ubuntu_test -it ubuntu bash.
When Docker finishes downloading the image, it reads the last argument we provided and starts that program for us in the container.
In this case, we will be launched into a bash terminal with root privileges inside the container.
We can go ahead and try out a few commands (ex. whoami, ls, apt), and when we are done, we can run the command exit.
Now we are back in our local command line.
We can run docker ps to check the status of the container we just ran.
The container should not actually be listed here.
Remember how we executed docker run with the --rm?
When we ran exit from inside the container, the bash session ended, signaling Docker to stop the container, and the --rm option informed Docker to also remove the container once it stopped.
Next Steps
Now that we have Docker installed and are familiar with running a few types of containers, we can take the next step by building images and learning about container orchestration. The next post in this series will cover both of these topics. In the meantime, try substituting a Docker container for one of your applications dependencies like a shared cache, messaging service, or database. If you look into databases, make sure to read up on managing data in Docker volumes to persist your database between container instances. If you're tracking with everything and want to continue learning, please check out Part 2: Building images and Docker Compose!